Most articles about AI image creation only talk about tools and features. But the real power of AI visuals is not just in the tools — it is in the workflow. How you plan, generate, select, refine, and use AI images makes the biggest difference. In this completely fresh and unique blog post, you will learn a practical creator-focused workflow for using AI image creation effectively. This article is written in simple English, original style, and safe for blog publishing.
AI Image Creation Is Not Just Generation — It’s a Process
Many beginners think AI image creation means writing one prompt and downloading the result. Professional creators treat it as a step-by-step process:
Idea → Prompt → Generate → Compare → Refine → Use
When you follow a workflow, your AI images look more intentional and brand-consistent instead of random.
Step 1: Start With Purpose, Not Prompt
Before writing any prompt, decide the purpose of the image.
Ask:
Is this for a blog header?
Thumbnail background?
Explainer graphic?
Social media post?
Product concept image?
Purpose decides style. A thumbnail image needs bold contrast. A blog header needs clean space. A social post may need emotion or action.
Most people skip this step — that’s why their AI images feel mismatched.
Step 2: Write Visual Prompts, Not Story Prompts
AI works better with visual instructions than story descriptions.
Bad style:
“a man who is thinking about future success in life”
Better style:
“young man standing on rooftop at sunrise, city background, cinematic light, realistic, shallow depth of field”
Think like a camera, not like a novel writer.
Step 3: Generate in Batches, Not One by One
Smart creators never generate only one image. They generate multiple variations and choose the best.
Batch generation helps you:
Compare composition
Pick best lighting
Avoid facial errors
Select strongest framing
Choice improves quality more than prompt length.
Step 4: Build a Consistent Visual Style
If you publish regularly, random styles hurt your brand look. Keep consistency by repeating style words:
Examples:
same lighting type
same color mood
same camera angle words
same realism level
same aspect ratio
Consistency builds recognition.
Step 5: Use AI Images as Base, Not Final
Unique creators treat AI output as a base layer. Then they refine.
Refinement may include:
Adding text overlay
Cropping for platform
Light color correction
Contrast adjustment
Brand color grading
This makes your result more original and less “AI generic”.
Step 6: Match Image Type With Platform
Different platforms need different AI image styles.
Blog images: clean, readable, less clutter
Thumbnails: high contrast, strong subject
Instagram: emotional or stylish
Ads: product-focused, clear subject
Education: diagram style, simple layout
Same prompt style does not work everywhere.
Step 7: Create Prompt Templates for Speed
Instead of writing prompts from scratch every time, create reusable templates.
Example template:
“[subject] in [location], [lighting], [style], realistic, high detail, professional photography”
Templates save time and keep output quality stable.
Step 8: Avoid the Over-Detail Trap
More words do not always mean better images. Too many style instructions can confuse the model.
If results look messy:
Reduce style words
Remove extra moods
Keep one main style
Keep one lighting type
Clarity beats complexity.
Step 9: Ethical and Safe Usage
Use AI visuals responsibly:
Avoid celebrity likeness prompts
Don’t recreate brand logos
Avoid copyrighted characters
Don’t copy living artist styles directly
Prefer original concepts
Safe usage protects your blog long term.
Step 10: Measure Performance, Not Just Beauty
Best AI image is not the most beautiful — it is the one that performs.
Track:
Click rate
Scroll stop rate
Thumbnail CTR
Share rate
Engagement
Performance > aesthetics.
Conclusion
AI image creation becomes truly powerful when used with a structured workflow. Instead of random prompt generation, creators who plan purpose, batch outputs, maintain style consistency, and refine results get far better visuals. AI is not just an image generator — it is a creative accelerator when used correctly. Bloggers and creators who build a repeatable workflow will stand out with more original and effective visuals.

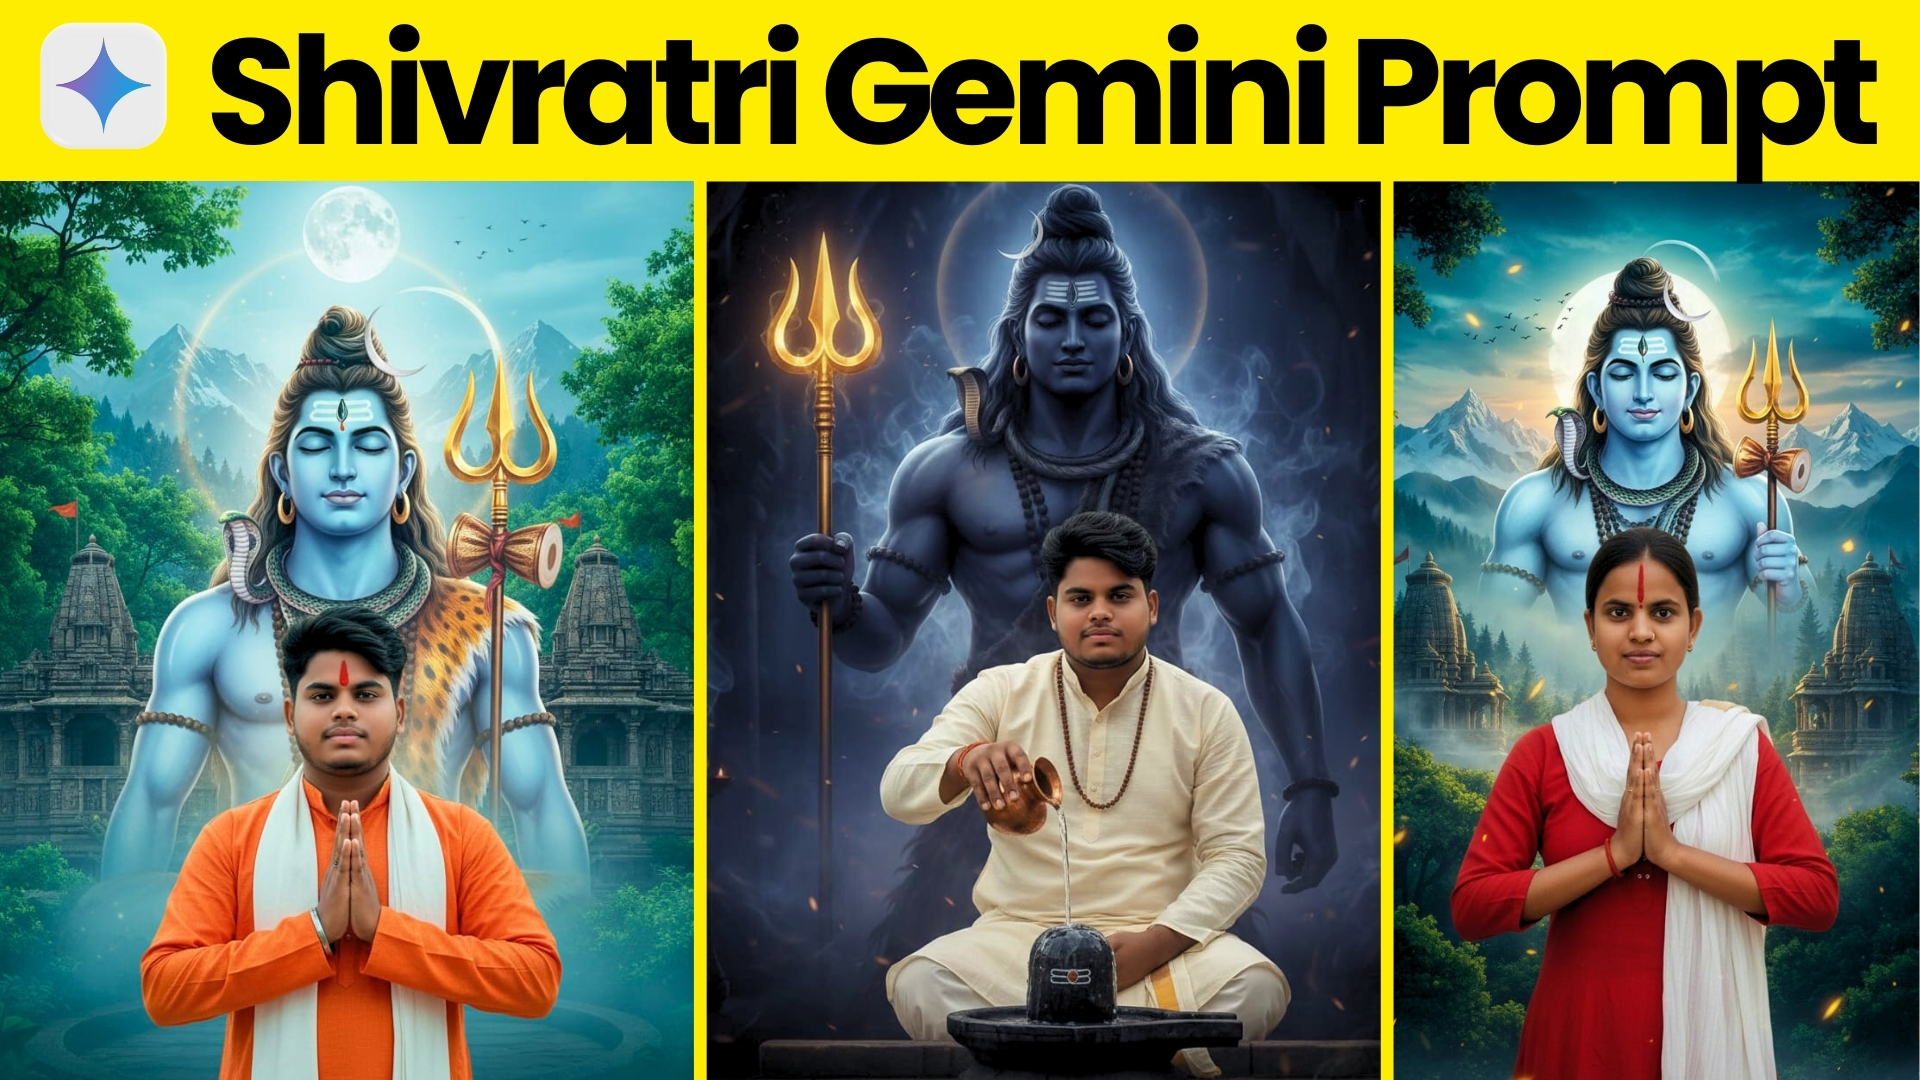
Use my uploaded Namaste pose selfie as the main subject in the foreground. Create a Maha Shivaratri devotional photo (2:3).I am wearing an orange kurta and a white dupatta around my neck. Add a large, divine form of Lord Shiva with a trident in the background. Surround the background with lush green trees and dense forest effects, temple structures on both sides, Kailash-style mountains, and a light mist. The sky should be light blue with a bright full moon and flying birds. Add blue-teal cinematic tones, a festive atmosphere, golden divine rays with a light mist and depth of field. Add a red tilak on my forehead. Ultra-detailed, realistic photo
manipulation, 4K, sharp focus, dramatic
lighting

Transform this image into a dark, cinematic fantasy scene while keeping the main male subject exactly the same – same face, hairstyle, pose, outfit, lighting,
expression, and background as in the original
image. Behind the man, add a majestic shadowy,
smoke-like Lord Shiva figure. Shiva should appear divine, powerful, masculine, broad-shouldered, and muscular, with a calm and protective presence. He is
holding a glowing golden trident (trishul) in one hand.Add a small half-moon placed naturally on the side of Lord Shiva’s head, resting on his locks. Shiva’s other
hand should be placed very softly and gently on the
man’s head, as if giving blessings. Place Lord Shiva very close behind the man, almost like a spiritual guardian standing over him. Modify the scene so that the man appears to be respectfully offering water to a Shivling, wearing an off-white traditional Indian kurta/dhoti style outfit with simple spiritual jewellery (rudraksha mala).Maintain a peaceful, divine, and spiritual atmosphere with soft mystical lighting, subtle smoke effects, and cinematic color grading.Overall mood: calm, sacred, devotional, and divine
fantasy realism. Size 3:4

A young Indian man standing barefoot in front of a large artistic wall mural of Lord Mahadev (Lord Shiva). The mural is highly detailed and spiritual, showing Lord Shiva with dosed eyes in deep meditation, blue skin, crescent moon in his hair, third eye on forehead, rudraksha mala, snake around the neck, and a trishul visible beside him. The wall has a textured, slightly rustic artistic
background with subtle vibrant paint splashes, giving a devotional yet modern street-art aesthetic.
The man is standing with his waist and back gently pressed against the wal like in the reference pose, body relaxed, legs slightly crossed at the ankles, one foot resting naturally over the other, completely barefoot touching the ground. His arms are folded across his chest, and his eyes are closed in a calm, peaceful expression as if meditating. His head slightly tilted downward in serenity. He is wearing a pure white formal shirt with full sleeves and formal black pants. He is not wearing anything on his feet, completely barefoot. The overall vibe should feel spiritual, cinematic, and peaceful.
Camera angle full-body vertical portrait, sharp focus on the man while keeping the Lord Mahadey mural dearly visible behind him., Soft natural davlight.
realistic shadows, high detail skin texture, ultra-realistic photography style, 8K resolution, cinematic color grading.
Very important: The man’s face must be a100% exact match to the provided reference image, with identical facial structure, hairstyle, skin tone, beard, and expression accuracy. No face alteration or approximation – exact face match required

Use a young girl’s uploaded selfie in a namaste
pose as the main subject in the foreground.
Create a Maha Shivaratri devotional photo (2:3).
The girl is wearing a red outfit and a white dupatta. Add a large, divine form of Lord Shiva with a trishul in the background. Surround the background with lush green trees and dense forest effects, temple structures on both sides, Kailash-style mountains, and a light mist.Include a sunset with a bright full moon and flying birds. Add blue-teal cinematic tones, a
festive atmosphere, soft mist, and golden divine rays with depth of field. Apply a red Shiva tilak on my forehead. Ultra-detailed, realistic photo
manipulation, 4K, sharp focus, dramatic
lighting.

Use the uploaded selfie of the young Indian couple in a Namaste pose as the main subject in the foreground. Create a Mahashivratri devotional photo (2:3). The boy is wearing a yellow kurta and a white dupatta around his neck. The girl is wearing an orange suit and a white dupatta. Both have applied red tilak of Lord Shiva on their foreheads. Add a large, divine form of Lord Shiva with a Trishul in the background. Surround the background with lush green trees and dense forest effects, temple

Turn this photo into a dark cinematic Mahashivratri scene. Keep my face exactly the same — no changes at all. Add a realistic, smoke-formed Lord Shiva standing protectively behind me, holding a softly glowing golden trishul. Place a small crescent moon on his jata. His hand should gently rest on my head in blessing. Make him strong, masculine, divine, and realistic — not cartoonish. Moody lighting, devotional vibe, ultra-realistic, high detail, cinematic shadows.